Eligibility Statuses
Configuration > Eligibility > Eligibility Statuses
Eligibility statuses are used to define student eligibility, which is used for eligibility reporting and claims.

-
Name - search by name
-
Include Inactive - check to include inactivated statuses
-
Reset - click to reset search parameters
-
Add New Eligibility Status - click to add a new eligibility status. Note: This is ONLY recommended if the state has custom income guidelines that result in eligibility statuses different than the standard federal free, reduced, paid. Custom statuses allow for the reimbursement level to be different than the pricing level.
-
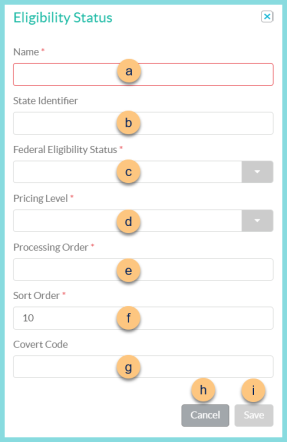
Name - enter eligibility name
-
State Identifier (optional) - enter a state identifier for documentation purposes if needed
-
Federal Eligibility Status - select the federal eligibility status (free, reduced, paid) for reimbursement rate determination
-
Pricing Level - select the pricing level (free, reduced, paid) for reimbursable item price determination
-
Processing Order - enter processing order priority (a lower number indicates a higher priority) Defaults: Free - 10; Reduced - 20; Paid - 30. (Example, State Reduced: 15, which is better than regular reduced but not as good as regular free.)
-
Sort Order - change sort order if needed
-
Covert Code - enter a code to use in lieu of 'Free,' 'Reduced,' and 'Paid' on the POS and reports
-
Cancel - click to return to the previous screen without saving changes
-
Save - click to save changes
-
-
Name - click to sort by name
-
Federal Eligibility Status - click to sort by federal eligibility status (free, reduced, paid)
-
Protected - click to sort by protected status
-
Active - click to sort by active status
-
Pencil - click to edit existing status. Note: Only certain fields are editable on protected statuses.
-
Name - enter eligibility name
-
State Identifier (optional) - enter a state identifier for documentation purposes if needed
-
Federal Eligibility Status - select the federal eligibility status (free, reduced, paid) for reimbursement rate determination
-
Pricing Level - select the pricing level (free, reduced, paid) for reimbursable item price determination
-
Processing Order - enter processing order priority (a lower number indicates a higher priority) Defaults: Free - 10; Reduced - 20; Paid - 30. (Example, State Reduced: 15, which is better than regular reduced but not as good as regular free.)
-
Sort Order - change sort order if needed
-
Covert Code - enter a code to use in lieu of 'Free,' 'Reduced,' and 'Paid' on the POS and reports
-
Active - toggle active status
-
Cancel - click to return to the previous screen without saving changes
-
Save - click to save changes
-
-
< > - click to scroll through pages